Child pages
  • Editing the site menu
Skip to end of metadata
Go to start of metadata

The site menu can be customised from this page. Any number of Custom Menu items can be added in a hierarchical structure, enabling users of the site to access content on the public web site.

Custom menu items appear directly beneath the 'built in' items (that in turn can be further customised or hidden).

Custom Menu Structure

A custom menu item has the following features:

  • A name - this is the text that displays on the menu item on the public web site. It should be brief (ideally no more than 15 characters).
  • Optionally have a 'target' ie the page/file that will open when the item is selected. The target is displayed in the tree view next to the item.
  • Optionally have 'child items' which appear as a sub menu when the item is selected. There is no limit on the level to which sub menus are nested.

    If the target is displayed as '?' it simply means that there is a valid target page, but the name is not displaying properly within the tree view of the administration site (it will still display correctly on the public site).

It is recommended that your menu is arranged logically, with related items grouped as a sub menu. 
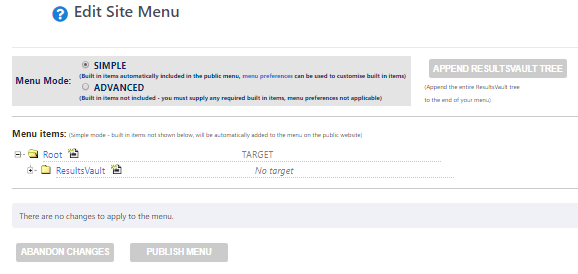
Menu modes

There are two modes for the site menu:

  • SIMPLE mode:

This means that a menu will be made up of a number of built in sections, combined with the dynamic section that is defined via the menu editor. Certain built in sections can be customised via the Menu Preferences page

In Simple mode, no built in sections are displayed in the menu editor, only the dynamic user defined section

  • ADVANCED mode:

This means that a menu is completely specified by the user, and no built in sections are displayed. However, individual built in menu items (such as links to News pages, or Results and Statistics pages) can be specified (see below '#Assigning or changing the target of a menu item).

This mode gives complete control over the menu, and is especially suited where the Results and Statistics menu needs to be further customised (eg links to specific grade pages).

If Advanced mode is chosen, it is not possible to access the Menu Preferences page, as these preferences are no longer valid. Advanced mode is not available in all SportVault packages.


When you first customise the menu a single item will appear - named Root. This is the top level of the new menu, and all items are created as 'child' items of the Root level. Any changes you make do not take effect until you click the Apply Changes button at the bottom of the screen.

Once this is clicked, the new menu is available immediately on the public site.

To add a new menu item under a current menu (the root menu is the top layer) use the following steps:

    1. Click the Create Child image .
    2. Enter a heading for the menu item (this will be the name of the menu on the site).
    3. Select the item the menu will link to from the drop-down list.
    4. Save the changes by clicking OK.

To edit the name of, or change the links of, an existing menu item, use the following steps:

    1. Click the name of the menu item.
    2. This opens the menu item's edit box.
    3. Save changes by clicking OK.
    1. Click the name of the menu item.
    2. This opens the menu item's edit mode.
    3. Click on the delete link in the lower left corner of the edit box.


The target of a menu item is the page or file that is displayed when the item is clicked in the menu (i.e. the URL). Menu items do not have to have a target - in most cases, an item that has child items will not have a target.

Items may be launched in a new window by checking the Open in New Window checkbox.

This would usually be the case for FILE or EXTERNAL target types.

Click the menu item to select it for editing There are seven types of targets, which are listed in the Target Type dropdown:

NONE

No target (this is the default for new items)

PAGE

This refers to a HTML page previously defined. Select the page title from the list.

GALLERY

This refers to a Slideshow Gallery previously defined. Select the gallery title from the list.

FILE

This refers to a file that has previously been uploaded. Select the filename from the list. Files can only be launched in a new browser window.

EXTERNAL

This refers to an URL anywhere on the Internet. The full URL (including http://) should be entered.

BUILTIN

This refers to a number of built in pages within SportzVault (these relate to pages accessible via the built in section of the menu in simple mode:

    • Home Page - Access the site home page News
    • Main news page Events
    • Main events page WebStore - Public WebStore page (WebStore option must be enabled)
    • About - Page giving summary information about the club/association, as well as office bearers (if entered)
    • Clubs - (associations only) Listing of clubs in the association
    • Grounds - (associations only) Listing of grounds in the association
    • Results and Statistics pages - individual Results and Statistics pages (for example: Fixture, Teams etc etc)

SEPARATOR

This provides a menu separator that is useful for grouping items within a sub menu. You cannot enter any other information if you select this option. Separators are not usually applicable in the top level of the menu.

BUILTIN is not available in all SportzVault Packages.

 Menu items can be moved anywhere on the tree by dragging and dropping the folder

    • To move a menu item as a child of another item: Drag the source item folder onto the target item folder.
    • To move a menu item to be positioned after another item (at the same level): Hold down the Control key and Drag the source item folder onto the target item folder.
    • To move an item to be positioned before another item (at the same level): Hold down the Shift key and Drag the source item folder onto the target item folder.

You can make any number of changes to the menu, however no changes will be applied to the public web site until you click the Apply Changes button . All changes will then be saved and will be available on your SportzVault site within a few minutes.

To abandon all changes, click the Abandon changes button. You will lose all changes made in the current session.


If neither Apply or Abandon is clicked, and you leave and return to the Edit Menu page later, you will receive a warning message that changes were made, but not yet applied. You will have the option of using those changes as a starting point, or taking the current site menu as the starting point.

  • No labels